Sunday, December 30, 2012

Crocheted Hearts Projects

It has been FOREVER since I blogged! I have been really consumed with homeschooling and just keeping up with normal life. Now it's Christmas break and I'm ready to get creative again! Hopefully it won't come to a screeching halt when school starts up again. ;) 
I learned something new and just had to blog about it. I watched a tutorial on YouTube on how to crochet a heart, and after watching, pausing, failing trying A LOT, I finally got it! I've added them to my Etsy shop and can't wait to make more! Find the hearts to make your own DIY wreath here.
I hot glued some hearts to a grapevine wreath for a cute addition to the front door.
I love these non-traditional colors together: cream, red, and gray. Find this garland here.
 I also made the traditional colors: light pink, pink, and red. Find it here. I'm curious to see which one sells more!
 I added the gray one to my pallet gallery in the dining room, and the photo on the bottom was just for listing purposes on Etsy. That one's all packaged up and ready to go to a new home. ;)

 This is now on a crate on my dining room table... I filled a blue ball jar with some epsom salt, added a few branches from the yard, and some hearts on strings for a cute little "tree".
 I have a lot of turquoise, teal, red, and mint in my house, so I thought I'd add a few turquoise hearts on my wreath to tie it in.

I'm totally obsessed. I've always seen people crocheting while waiting places and wanted to learn. My Grandma Doris taught me how when I was little, but I completely forgot how. She was the absolute best. I loved getting her zig zag blankets. She was ahead of her time with the chevron thing. ;) If you don't know how or don't have time to learn, all of these hearts and garlands are for sale in my Etsy shop, Distressed Beautiful. 

Friday, November 16, 2012

Bravo Farms Smokehouse Press Release


FOR IMMEDIATE RELEASE                                                                                                         November 16, 2012
Bravo Farms Smokehouse Opens in Downtown Visalia
An enticing new restaurant has just opened in downtown Visalia. Bravo Farms Smokehouse is now open and features artisan style barbeque, and the fresh quality that you would expect from their trusted name. The restaurant is open for lunch and dinner, and offers patio and bar seating. After months of creative renovation, the smokehouse has given new life to the former Wagon Wheel building, located in the heart of downtown Visalia, at 400 N. Willis St.
                “We are excited to bring Bravo Farms to Visalia. With the smokehouse, we are taking it up a notch by adding full-service dinner”, said owner Jonathan Van Ryn. Lunch features a dynamic offering of custom salads, wraps, soup, sandwiches, and sides. Dinner boasts a variety of barbeque offerings, including: tri-tip, steaks, ribs, and more.  The menu brings a bit of southern flair to the valley. The comfortable bar offers an impressive selection of beer on-tap, showcasing many local beers, as well as an array of notable wines.  In classic California style, guests have the option of being seated in the full-covered patio for their dining pleasure.
                The restaurant atmosphere is sure to please, with its’ clean, upscale twist on the vintage-rustic style. No detail was overlooked, from the wood-planked walls, to the vintage style red phone at the welcome counter. Upon entering, customers are greeted by a beautifully appointed gift shoppe. Have their creative staff assemble a beautiful custom gift basket for the holidays or any occasion.  The restaurant has seating for hosting guests with large parties, and special events. Families and foodies alike are sure to take notice of this valuable new addition to downtown Visalia.
Hours: Lunch Mon-Sat, 11am-3pm       **Correction** Will be closed on Sundays!
Dinner Mon-Sat 5pm-9pm (Fri-Sat open till 10)   
Bravo Farms Smokehouse phone: (559) 738-9190
                                                                              ###

            On a personal note, I'd like to add that the staff here are wonderful. They always seem to have the best, most friendly crew. Years ago, we went into Bravo in Tulare and over time, some of them have become great friends. I don't just tell you I love their food because I love the people, I LOVE the food. Seriously, I got suckered into the McDonald's drive thru (I loathe McDonald's) the other day and it was horrible (of course), and it was MORE money than if I would have taken the kids to Bravo for their lunch prices! I hope there are great things in store for Bravo in Visalia, and judging by the crowds so far, that will be the case. 

Friday, November 9, 2012

Bravo Farms Smokehouse Opens in Visalia

Bravo Farms has arrived in Visalia! This week, Bravo Farms Smokehouse opened its' doors. I'm currently crafting their press release, and today I snapped a few pictures of their beautiful renovation. If you are a local, you know that this building is completely unrecognizable from what it used to be. New life and fresh ideas have been breathed into this location.

Guests can feel right at home in the beautifully decorated restaurant. I love that there are different areas to eat in, and each area is just a little bit different. I'm really drawn to the gorgeous mint booths, with dark wood tables, against this rustic brick wall.
Grab a comfy stool or table in the bar and enjoy a big selection of California beer and wine.

As always, they have a beautiful gift shoppe stocked with goodies to take home or build a custom gift basket.

They have a fully covered patio for outdoor dining. 

Be sure to check them out at 400 N. Willis St. in Visalia. You'll be glad you did!  Bravo Farms Smokehouse phone: (559) 738-9190
Mon-Sat    Lunch 11-3         Dinner 5-9 (Fri & Sat open till 10pm)

Thursday, November 8, 2012

Ultimate Fried Chicken

Yesterday when I asked my husband what he wanted for dinner he said, "fried chicken". Aw rats!  I mean...great, honey! Fried chicken isn't hard, it's just MESSY and time consuming. Lucky for him, I caught The Help on tv again this weekend. When Minny was teaching Celia Foote how to fry chicken, and she used a big paper bag to bread it- my curiosity was raised. That's one of the messiest parts of fried chicken...the breading! Here we go...
 The store I went to didn't have any chicken with the bone in it, so I bought a whole chicken, and we cut it up into pieces. Who knew it was so easy? Buying the chicken whole is so much cheaper, so I think we'll be doing that from now on for fried chicken.

Cut up your chicken. Get out a paper bag (it kind of weirded me out at first, thinking there could be germs in the bag, but then I remembered that no germ can survive the amount of heat this chicken is going to cook in), dump a few cups of flour in it. I didn't measure, I just went for it. Here's where I have to estimate, because I didn't anticipate blogging about this recipe, but someone asked for it. ;) Shake in however much seasoned salt, garlic granules, and pepper as you'd like. A little tip: add more than you think you'll need because some of it will be left behind in the flour you throw away. I'm thinking it might be 2 Tbsp. each of seasoned salt and garlic, and 1 Tbsp. pepper, but that's just an estimate. Mix the seasonings up with the flour.

Have your oil pre-heating on the stove. You need it hot when the chicken is breaded. It sounds crazy, but it's really important to use a lot of oil. I know, I know, but if  you have it hot enough when you drop the chicken in, it kind of seals the chicken, and you're left with juicy chicken inside when you're done. If you skimp on the oil, you might as well not make fried chicken. It won't cook right. I used two big skillets, and divided a regular size bottle of oil, and a half between them.

Beat 2-3 eggs in a dish.

VERY important! Dip your chicken, a few pieces at a time (don't crowd the bag) in the flour BEFORE you dip them in the egg! Your egg has to have something to stick to or it will fall off of the chicken, and so will your batter. So! Light coating in the flour mixture bag, then into the egg, then back into the bag to pick up a lot of the seasoned flour. Then straight into the hot oil.
 I'd like to tell you a cooking time, but since every piece of chicken is a different size, you need to watch them. Flip them about every 7 minutes or so, and turn down the heat to medium after the initial browning on both sides. The big breast pieces take about 35-45 minutes, depending on their size. Legs and thighs about 25-35 minutes. Wings about 20. If you're not sure, take it out of the pan, and poke through with a fork, if the juice runs clear, it's done.Remember this meat has bones in it, so it takes longer.

Have a tray ready, with a cooling rack on top of it. I like this method better than paper towels because the bottom doesn't get soggy. The oil will drip off and your chicken will be crunchy all around!
Hopefully my directions are easy enough to follow! If you skip steps to save time, your chicken will suffer. I've been making fried chicken since I was a young teenager, and my husband said last night's was BEST I've ever made. He wouldn't stop talking about it. Enjoy!

Wednesday, November 7, 2012

Antler Wall Art

I've had this project in my head for months and I've been so busy that I just now had time to do it. I'm loving that antlers are making their waves in home decor right now. This is a shed that my husband found in the mountains a few years ago. He lost them for awhile and after cleaning out the garage, we finally found them. Deer are so prominent in other areas, but finding these in the mountains near us is like finding gold to a hunter. 
 I found this verse that goes perfectly with it. "As the deer pants for streams of water, so my soul pants for you, my God." Psalm 42:1

I had these old boards in my garage for over a year. They were already screwed together like this, I just decided to stain them so that there would be a good contrast against the light antlers. In case you're wondering, I just used 2 part epoxy to glue the antlers to the wood. 

Monday, November 5, 2012

Parmesan Roasted Asparagus

 This is probably OLD news for most of you, but I'm posting it on the small chance that you were oblivious like me. I had NO idea that roasted asparagus were so delicious! And EASY!
All you do is rinse your asparagus, and trim the hard stalk ends if necessary. Toss 'em on a oven safe pan, drizzle a couple of tablespoons of olive oil on them, and top with salt and pepper. Roast at 400 degrees for 10-17 minutes, depending on the thickness of your spears. Mine were the skinniest I've ever seen, and they took about 10 minutes. Just peek at them so they don't overcook and get mushy and dark. For the last 4-5 minutes top them with shredded Parmesan cheese and put them back in the oven for it to melt.
 Here is a peek at my lunch today! I saved a handful last night, so that I could bake some fresh today.

 I made these for dinner last night with stuffing, and the roasted chicken (below) and I could NOT stop eating them! Even my KIDS asked for more!!! What?!

In case you're wondering the chicken was delicious. I didn't plan on blogging about it, so I neglected to take an "after" picture. It was stuffed with a few big slices of onion, sprigs of rosemary, a couple of celery stalks, and a garlic clove. I put butter under the skin, and on top, with kosher salt and cracked pepper. Bake that baby in an oven bag to seal in the juice and YUM, YUM!

Thursday, November 1, 2012

Indian Headdresses

Today we met with another family that we do science and social studies with. We have been studying the Pilgrims, in preparation for Thanksgiving, and I must say I even learned a few things I didn't know! It's actually quite interesting, and makes you realize how difficult of a time they had. We decided we would end our study with a family Pilgrim Feast meal, coming up in a couple weeks. To make it even more interesting {Hello, TWO Thanksgivings!} we let the kids choose to dress up as pilgrims or Indians. Of course, they all chose Indians! Guess the parents will be pilgrims. ;)
 The headdresses turned out so cute, I had to share! I didn't even know what I was going for, but after wandering around Hobby Lobby, I made up my mind. They sell these wide strips of fur bands. I bought two white, and two brown. Of course all of the kids wanted white, so we drew slips of paper for the white ones. The strip several inches too long, so when we trimmed them to fit their head (leaving a few inches to overlap the seam), we traded colors so the kids could add a second fur color piece. Perfect!

 Once the piece was cut to fit their head, they chose feathers and beads that we would help them hot glue on. The kids had the fantastic idea to thread beads onto the feathers!! We gave them yarn to thread beads to hang down from the sides if they wanted. I love how all of the kids used the same supplies and all four headdresses turned out so different! So cool!


After they showed us where to hot glue their decorations, we then did a second "fitting" and then hot glued the closure flap (without it on their head of course). You could always sew the fur piece together, but we figured we'd make it easy, and it worked perfectly!

Tuesday, October 23, 2012

Vintage Luci Lu {Vintage Rentals}

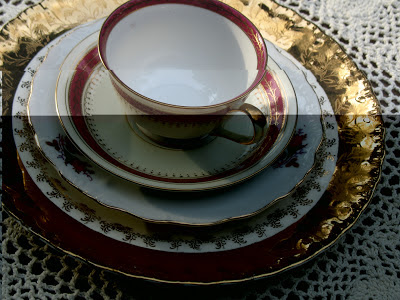
This morning I got to have coffee with one of my favorite people! She is starting to rent out her large collection of vintage dishes. You can see in the photos below that the combinations are almost endless. I used her dishes for my 30th birthday party. Sometimes you want something with style and age, and if so, Vintage Luci Lu is right up your alley!


This is just SOME of what she has to offer. She also has some linens, vintage lace, and serving pieces. Interested in making your next party stand out? Contact her at: vintagelucilu@gmail.com