Thursday, April 28, 2011

A Taste of Orange Blossom {Big Daddy Prime Rib Sandwich}

Tonight we took the family to Orange Blossom since I will be out of town during our regular date night this week. They have a new special this week- The Big Daddy Prime Rib Sandwich!Since all specials are 3 course meals, we had the Avocado Salad with Red Pepper Dressing. We are in love with this special salad!

Brandon did the honors tonight of trying the aptly named Big Daddy Prime Rib Sandwich. NO ONE loves sandwiches more than Brandon. He will make us choose where we're going to eat based on their sandwich selection! He HAD to be the one to try this sandwich!

He loved it! They thinly slice their fabulous Smoked Prime Rib, cooked medium rare. It is heaped on toasted whole wheat bread, and topped with Dijon mustard, a little horseradish, red onions, lettuce and tomato. LOOK at that huge pile of TENDER roast beef! Now you see why it's called the big daddy! ;)

We ended our night with some Chocolate Trauma! Homemade chocolate ice cream on top of a chocolate ganache tart, with hot fudge, caramel and drizzled with white chocolate! Heck yes! What a delicious night!


Check out their website here!

Wednesday, April 27, 2011

Monogram Block

Yesterday I played around with my new miter saw and cut some wood for various projects. I had a piece this size leftover and I knew just what I wanted to do with it!


First off, I ran my sander around the rough edges. Next up, I gave it a coat of Heirloom White spray paint. Then I roughed up the sides with my 3m sanding block. The picture below shows what it looks like after I added Valspar Antiquing Glaze. Just apply lightly and wipe off with a paper towel until you get the desired look. It will cling to the sanded areas more, making those parts darker.


Edge view...


After I let it dry for the afternoon, I cut a large B out of gray vinyl with my Silhouette. Then I cut Baeza out of black vinyl. Whenever I am using vinyl for wording, I use transfer tape. It is so much easier! The letters don't get bunched up or uneven.


I LOVE the way it turned out!!! It looks perfect on my new rustic shelf I made today!


Rustic Shelf

I could not be more thrilled!!! It is not very often that something comes together even better than you planned! Today it did!


I bought this old worn down window -without glass- for $8 at Paris Flea Market a week ago. I had this old piece of wood in the garage for awhile now too. I thought, wouldn't it be cool if I made my own rustic shelf?


I went to Home Depot and bought two solid wood corbels for $11 each. I spray painted them Rustoleum's Heirloom White. After they were dry I roughed them up with my 3m sanding block. Next up I used Valspar Antiquing Glaze to weather them a bit. I applied it with a foam brush and then wiped off immediately with a paper towel. Want it darker? Add more. Want it lighter? Use a lighter coat. I love this stuff!


This is what they looked like when I was done. Now I have the base to my shelf. They come with screws and there is a groove for it on the back so they sit flush with the wall.


After cutting my wood board, I had raw edges that didn't match the worn look of the rest of the board. I just added some glaze to these too, just lightly, and wiped off. The glaze grabs to the raw parts of wood a lot more, so you have to be careful with that.


I used my stud finder to locate the wood in the walls. Then I installed the corbels, making sure they were level. Next I laid my board across it, leaving just a tiny lip on each side of the board. It just so happened that's where it ended up with where the studs were in the wall and I like it that way! Then I screwed in a screw from the top of the board on each end of the shelf, drilling it into the corbel. Voila! Done!


I could not POSSIBLY love it more!!! I realize I am showing you a picture and I haven't bought a candle yet for the candle holder, but I was too excited!


I love the contrast of the corbel with the heirloom white showing underneath the antiquing and the dark weathered wood.


I'm going to show you how to make this bad boy soon! I love it!


Notice the old lock hanging on the nail. I had that laying around the house.


What a score for $8 huh? I LOVE the frame!


Decor Rundown:


Corbels $22 Home Depot


Shelf FREE


Frame $8 Paris Flea Market


Bike $10 Hobby Lobby (50% off)


Key Frame $7.00 Hobby Lobby (50% off)


Candle Holder $7.50 Hobby Lobby (50% off)


Baeza block FREE


Kitchen {Open Shelving}

I was inspired to take the doors off of one of my main kitchen cabinets. If you haven't checked out The Lettered Cottage, I highly suggest you do. And hold on to your hat, because you will blown away at the before and afters! Here is my messy, embarrassing "before picture". I remembered to take it after I had already started emptying it on the counter.

After removing one door.


When I asked my husband if I could do this, his first response was "will we have to buy new dishes that match?" I told him that I was just going to group the ones that do match. I only displayed the white, turquoise and clear glass items.

After living with it like this for a few days, I decided the back was too plain and washed out with the white cabinets.

I bought a roll of paintable beadboard wallpaper at Lowes. It was $15 and I have a huge roll left for other projects! It was really easy to work with. The hardest part is waiting 24 hours before painting it, like the directions said. When smoothing it out, BIG glops of glue would ooze out the bottom, which I had to wipe up with paper towels. They were gross, lets' just say they looked like something you see before you go into labor, and it rhymes with "Lucas dug". ;)

So, bright and early the next morning {before I even had my coffee!!} I taped it off and painted it.


Yes, that is a paint swatch you see in the background. I think I am like the WORST paint color picker {that's a technical term} in the world! Not that it's not a pretty color, just not what I thought it was going to be. I am going to live with it for a few days, but I might change it. Its too bright and light for me.


I love the beadboard texture even though I might change the color! Word to the wise, even if you are using the wallpaper to get a white beadboard effect you'll need to paint it white. It doesn't look that great after the glue dries, it's dark in some spots and just basically not white.

FINAL Bathroom Changes!

If you read my last bathroom post, you know that I was less than thrilled with the wall decor. I ended up returning the metal knob board to Hobby Lobby. I've had this mirror in my garage for months, but I didn't know where to put it. I bought it cheap at the Just Between Friends consignment sale. I love the yellow, but it doesn't really match anything in my house. I decided to paint it gray. I put two coats of kilz primer, and two coats of paint. I would love to sand the edges and rough it up a bit, but I'm afraid of exposing the yellow paint.


The other thing I decided to do was add the gray smaller zinnias. I like it MUCH better now. For the smaller stencil I used a foam brush and just dabbed it straight up and down instead of using a roller. I tried it with a roller and didn't get great results on this intricate stencil. The way I did it worked perfectly though! Remember, my stencils are from Cutting Edge Stencils! :)


I have been reading about Washi Tape, and seeing it on etsy and blogs. I decided to order a couple of rolls. It's patterned paper tape.


Here is a close up of the design. This tape is gray so I thought it would be cute to add it to the frame.


This last update I have to do so I can FINALLY be done with the bathroom is to add this metal knob to the mirror. I bought it at Hobby Lobby, it was $4.99 but they were 50% off! ;) It has a long screw on the back and I need the hubs to cut it down with his grinder. I may not be afraid of the saw that could easily cut my hand off, but I am afraid to use the little tool that makes sparks fly!

Monday, April 25, 2011

Bunny Cake

When I visit my family in Ohio, my mom and I inevitably end up in the basement going through all of her bakery packaging. The woman owns every shape/type/size of food packaging you can imagine. I always end up stuffing my suitcases full of some of each before coming home! Last time we found bunny cake boxes. She told me how to make the cake, and buy the bunny face. I looked up the bunny faces online but they only came in sets of 12 and I only needed one. There was no way I was going to spend that much money on a silly cake! I decided to make my own!
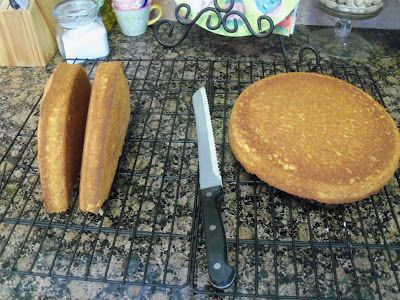
First, bake your round cakes. You only need one, so you'll have one leftover. After it cools, cut it in half.

I didn't have the board to go in the box, and was too lazy to go buy one so I cut cardboard with a craft knife and covered it with wax paper. Put a bit of frosting on the board so the cakes will stick. I made this recipe for buttercream from Confessions of a Cookbook Queen.


I freehanded a bunny face with melted candy melts on wax paper. I am LESS than thrilled with how it turned out, but it was for family, and it was FREE!

Stand up your cakes, with frosting in between them to hold them together. Then frost all over it and add the face and a big dollop of frosting for the tail.


See the super cute box? It even has a handle.


Bunny Bait {Chocolate Covered Popcorn!}

I saw this idea for Bunny Bait over at the blog Bake at 350. It looked super cute and tasty! I couldn't find the tender white popcorn so I used Orville R. Natural simply salted. It doesn't have butter. Salt and chocolate go hand in hand so I figured that would be ok! I popped two bags of popcorn and threw them into a large bowl. I attempted to dig out any unpopped kernals from the bottom of the bowl. While I removed most, there were still a few lingering. The good news is you are able to see them even after covered with chocolate, so you can pick it off before eating it. I was scared you wouldn't be able to see them and the kids would bite hard on a kernal.

Melt your candy melts in the microwave, 30 seconds at a time and then stir after each turn until melted. Pour over the popcorn as you stir it. I used one full bag of candy melts to two bags of popcorn and one bag of m&ms. Dump in the m&ms and add a good amount of sprinkles. I used a third to half of the jar of sprinkles. Mix it all up well.

Lay it out on wax paper and allow to dry.


I found these little bunny treat bags and filled them to go in the Easter gable boxes I made for all of the kids at the family Easter gathering.


The extra got bagged up in cello bags and taken to the lunch in a basket with the peep pops for people to grab. One of the bags never made it there because my mother in law tasted ours in the jar when she babysat on date night....she loved it, so I gave her a bag. ;) It's super easy and SO yummy! It can easily be changed to match any holiday that you match the m&ms to! I will definetely be making this again!