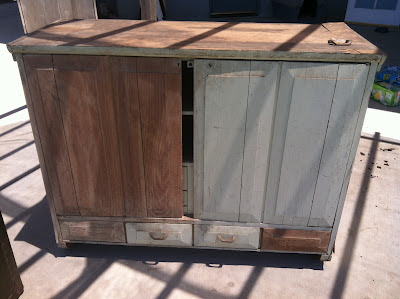
I must say, this is one of my all-time favorite re-do's! It was a whopping $15 at a yard sale Saturday!
Check out what it started out as...Of course my hubby thought I was crazy (again!), but I saw potential. I loved the doors, but there was a section of one of them missing. Because of the detail in the panels, I decided to just remove them. I saved them so that I can use them for something else.
It was completely filthy, and full of spider webs. The first step was to spray this sucker with bug spray, especially underneath!
The next thing I did was pressure wash it REALLY good. There was some thin paneling type of wood on the top of it, which had already peeled off in sections, so I decided to take the rest off, and go with the wood planks I saw underneath it. The paneling was glued down pretty good, so I used a scraper and tapped it with a hammer to chip it off.
After that, I sanded the top to get off the stuck on pieces.
You'll see I started to paint the interior sections gray, but I decided it wouldn't match my house. I ended up switching to the same Valspar Honeymilk that I used on my dining room table.
Removing the doors wasn't as easy as it seemed. There was a stripped screw on this side and it wouldn't allow the metal hinge to come off. In the picture below, you can see the door closure pieces that also would not come off with screw drivers or drills.
I saw my hubby use his sawzall the other day to cut screws so I asked him to borrow it. He didn't have time to do it for me, so I went ahead and did it. It's kind of fun to use a new tool! Especially when you still have all of your fingers left when you're done. ;) It easily cut off all of these pieces and I was good to go!
After the paint dried, I used sandpaper to distress the edges of the cabinet and drawers. I had a really hard time finding drawer pulls that were small, like the originals. The original pulls were one short, so I needed new ones. I settled on these from Hobby Lobby and spray painted them black. I lined them up so that they would cover the old holes.
Then I simply screwed them on with a cordless drill.
I bought two baskets at Hobby Lobby for 50% off, but wanted to jazz them up a bit. I stumbled across these metal numbers and knew what I wanted to do. I simply cut a piece of jute, and tied a knot in the center of it. I pulled it through the hole in the number.
Now I'm ready to tie it to the basket.
I placed it where I wanted it, and slipped the jute through the basket.
I tied it in a double knot around one of the weaves in the basket.
Love it!
I can't wait to figure out what I want to store in here! The black bins are from Target.
I am SO glad I bought this thing!!! :)


Wow! It looks fantastic!
ReplyDeleteI came over from Beneath My Heart. So glad...this is an awesome makeover! Great job! And those baskets are perfect.
ReplyDeleteKelly
I also found your link at Beneath My Heart. What a great find and awesome makeover. I love the number idea. The baskets and bins fit perfectly. Good for you!!
ReplyDeleteI love it! Great job :)
ReplyDeleteGreat job! I love how it turned out, and the baskets and bins are perfect. Good vision on your part...think I would have kept my $15.
ReplyDeleteGreat Makeover!!! Thanks for linking up to my party! :) I'm featuring your makeover in my post today.
ReplyDeleteTraci