Saturday, June 30, 2012

Nightstand Redo

Yesterday I happened to pass a garage sale on my way to the store. I kind of like that people are having Friday yard sales too now, more opportunities to stumble upon goodies in need of love. I've been working on changing our school room into Emma's room for the past month. I'm not done and ready to show it all yet, not by a long shot, but we're getting there! I moved our school room out to what used to be the play room. 
 She was in need of a nightstand next to her bed, and this piece was only $8 at the yard sale. It was laminate, but I decided to research how to paint laminate and give it a shot. It was only 8 bucks, after all.
 After some searching on Pinterest last night, I decided to try this tutorial from DIY Kinda Girl. I bought a quart of Zinsser Cover Stain Primer. I chose this one because she said it was designed to stick to any surface without sanding. You can click over and read her instructions, but basically I just did two coats of primer, followed by two coats of white paint that I already had on hand.
 I spray painted the knobs because I didn't want to buy new ones.
 This is another thing I added to her room-in-progress, a cupboard door hanger. Check out what it used to look like here. I peeled off the old vinyl lettering and added the peace sign, hearts, and pennants to match her room.
 She rushed to put a few items on her nightstand herself, so much for mom decorating. Ha ha.

I think this turned out to be another great yard sale find. I should be ready to share her room in another couple of weeks. I still need to buy or build a headboard.
Cost breakdown:
night stand $8
primer $8
paint (already owned)
spray paint (already owned)

Friday, June 29, 2012

Living Room Wall Update {Indoor Shutters and New Frames}

Yesterday I decided to do something about my hodge podge living room wall. If you look at the picture below, you'll see what it used to be. Forgive the poor picture quality, because of all of the high windows in my house, it's hard to get a good picture during the day. 
First, I realized that I had wooden shutters that I could put up next to the window. These used to be the headboard in Cami's room. I have been working on moving the school room, and giving Emma her own room. Long story short, Emma got the queen bed, but didn't want the shutters as her headboard. I'll post about the new rooms when I get them done. 
I added these two pieces because it felt like it should be symmetrical after I put up the shutters.

 Last week I picked up these two large frames for less than $3 each. Rescued Treasures was having a 50% sale on their frames.
 I didn't know what I wanted to put in the center, but I decided on these wooden detail pieces from Lowe's that were about $5 each.
 The inside of these frames are 11x14. They didn't come with a backing, so I had to make one.

 I cut a thin piece of plywood to fit, and stained one side.I secured them with a staple gun. Since I used this cheap plywood, when I stained it, it resembled old wood paneling (think 70's). I didn't like it, so in the pictures you see, I went back and added burlap, so that you can just see a border of the dark wood.


It has made my living room not look so hodge podge. That wall had looked unplanned, and now it looks like someone actually thought about it.

Thursday, June 28, 2012

Bakerella's Yellow Cake

Yesterday my wonderful hubby turned 33! A few months ago, I made Bakerella's yellow cake and fell in love. My husband is crazy isn't big on chocolate, so I made the next best thing! This cake with a classic buttercream frosting SCREAMS wedding cake to me. 

Now, I must admit, there has been one time when I made this cake, and it didn't turn out great. For my 30th birthday I think I over-baked it and dried it out. It was also the hottest April day we'd ever had and it spent the whole day in the fridge and it was super dry and crumbly by party time. Trust me when I say, if you make this cake right, it will be like the old fashioned cake your grandma used to make. It's super easy and only has a few ingredients, just don't over-bake! So yummy!

Wednesday, June 20, 2012

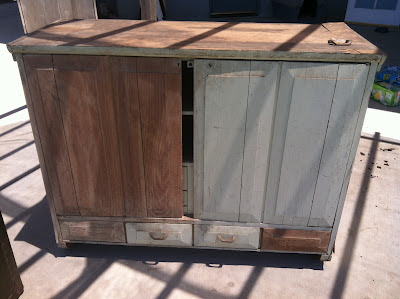
Trash to Entry Table

I must say, this is one of my all-time favorite re-do's! It was a whopping $15 at a yard sale Saturday! 
 Check out what it started out as...
 Of course my hubby thought I was crazy (again!), but I saw potential. I loved the doors, but there was a section of one of them missing. Because of the detail in the panels, I decided to just remove them. I saved them so that I can use them for something else.
 It was completely filthy, and full of spider webs. The first step was to spray this sucker with bug spray, especially underneath!
 The next thing I did was pressure wash it REALLY good. There was some thin paneling type of wood on the top of it, which had already peeled off in sections, so I decided to take the rest off, and go with the wood planks I saw underneath it. The paneling was glued down pretty good, so I used a scraper and tapped it with a hammer to chip it off.
 After that, I sanded the top to get off the stuck on pieces.
 You'll see I started to paint the interior sections gray, but I decided it wouldn't match my house. I ended up switching to the same Valspar Honeymilk that I used on my dining room table.
 Removing the doors wasn't as easy as it seemed. There was a stripped screw on this side and it wouldn't allow the metal hinge to come off. In the picture below, you can see the door closure pieces that also would not come off with screw drivers or drills.
 I saw my hubby use his sawzall the other day to cut screws so I asked him to borrow it. He didn't have time to do it for me, so I went ahead and did it. It's kind of fun to use a new tool! Especially when you still have all of your fingers left when you're done. ;) It easily cut off all of these pieces and I was good to go!
 After the paint dried, I used sandpaper to distress the edges of the cabinet and drawers. I had a really hard time finding drawer pulls that were small, like the originals. The original pulls were one short, so I needed new ones. I settled on these from Hobby Lobby and spray painted them black. I lined them up so that they would cover the old holes.
 Then I simply screwed them on with a cordless drill.

I bought two baskets at Hobby Lobby for 50% off, but wanted to jazz them up a bit. I stumbled across these metal numbers and knew what I wanted to do. I simply cut a piece of jute, and tied a knot in the center of it. I pulled it through the hole in the number.

 Now I'm ready to tie it to the basket.
 I placed it where I wanted it, and slipped the jute through the basket.
 I tied it in a double knot around one of the weaves in the basket.
 Love it!
I can't wait to figure out what I want to store in here! The black bins are from Target. 


I am SO glad I bought this thing!!! :)
I am excited to link up to Beneath My Heart's "Best DIY Projects of June" Party!
Positively Splendid

Saturday, June 16, 2012

Colorful Distressed Frames

I've realized recently that my house has become too turquoise. I have resolved to add more colors, and refrain from adding TOO much of one color, hard as it is for me. I found six of these wood frames for $1.48 each at Rescued Treasures. I bought them all and headed to Lowe's for paint.One of the colors I've decided I need to add is red. It goes well with turquoise. Have you been to the Lowe's paint department lately? They have a display of some beautiful color samples, already mixed up and ready to go. Great for projects! The dark one is Gypsy Teal (pre-mixed section), the lighter one is Tantalizing Teal, and Heirloom Red, all Valspar. I gave them each about 3 good coats, and then used a 3M sanding sponge to distress the edges.

 I love the way they look distressed. They didn't come with any backing, so I cut a piece of foam board into 5x7 pieces and covered them with black and white chevron paper from Hobby Lobby. Last, I used E6000 glue to add the clips from Wal-Mart. I hammered in sawtooth picture hangers, and voila!
 Hanging them was easy! Have you ever used the toothpaste method? You put a tiny dab of toothpaste on the back of the frame, where the nail will be, and then push the frame up against the wall where you want it. The dab of paste sticks to the wall and shows you exactly where to hammer in your nail. :)
 I love the pop of color that these frames have added to my living room!