Showing posts with label chairs. Show all posts
Showing posts with label chairs. Show all posts
Wednesday, June 6, 2012
Chevron Chair
Tuesday, July 19, 2011
Dining Set Complete!
Welp, I did it. It's done. C'est fini. Yesterday I went to a couple of thrift stores on the hunt for my two final chairs and I finally found them at Salvation Army. Brought them home and OF COURSE I ran out of both cans of spray paint halfway through each chair! Ughh! I got more paint and finished them last night though! Missed how I re-finished the table? Click here to see the before pictures. Yesterday I went to Pier 1 looking for placemats and ended up finding chair cushions half off! You can see I have to buy one more today for the new cream chair on the end. I didn't want to buy more cushions until I found the chairs. One of the chairs doesn't need a cushion because it has a seat that I re-upholstered already.
 This chair was a whopping $5.50. I unscrewed the seat and spray painted it Exotic Sea Spray. {Valspar-Lowes}
 Now I'll show you the whimsical chair cushions I picked out...
 They all have the aqua/turquoise-ish color in there somewhere so that they tie in. I love that it adds so many colors to the room and really turns up the fun.
 Even the ties on these cushions are cute!


 This one has beads on the bottoms of the ties!

 I love the back on this one. It was my other Salvation Army find and it was $9.50 but it was on sale so it ended up being less than $7! I'll be picking out a cushion for this one today! :)
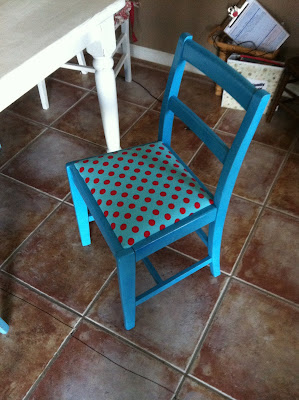 The chair from the beginning has a new life with some cute polka dot fabric!
 I LOVE the way it turned out! My house feels so different now, and we have more room! The old table was great, but it just wasn't "us". If you read Cupboard Door Makeover, you know that I don't really do whimsy...until now! I think the trick is to not do TOO much whimsy. This will probably be as far as I'll dip my toes in the whimsical world of decorating. :)
Yesterday I went to Pier 1 looking for placemats and ended up finding chair cushions half off! You can see I have to buy one more today for the new cream chair on the end. I didn't want to buy more cushions until I found the chairs. One of the chairs doesn't need a cushion because it has a seat that I re-upholstered already. This chair was a whopping $5.50. I unscrewed the seat and spray painted it Exotic Sea Spray. {Valspar-Lowes}
 Now I'll show you the whimsical chair cushions I picked out...
 They all have the aqua/turquoise-ish color in there somewhere so that they tie in. I love that it adds so many colors to the room and really turns up the fun.
 Even the ties on these cushions are cute!

 This one has beads on the bottoms of the ties!
 I love the back on this one. It was my other Salvation Army find and it was $9.50 but it was on sale so it ended up being less than $7! I'll be picking out a cushion for this one today! :)
 The chair from the beginning has a new life with some cute polka dot fabric!
 I LOVE the way it turned out! My house feels so different now, and we have more room! The old table was great, but it just wasn't "us". If you read Cupboard Door Makeover, you know that I don't really do whimsy...until now! I think the trick is to not do TOO much whimsy. This will probably be as far as I'll dip my toes in the whimsical world of decorating. :)
Linked up to Lipstick and Laundry's Turquoise Tuesday Party.
Sunday, July 17, 2011
Distressed Dining Table
Well, here we go! I suspect this post is going to be long, because this project took me ALL weekend to do! I STILL have to find and spray paint two more chairs but that will be easy. Here is the tale of a craigslist table turned shabby chic. I like to show the finished product first... The table that came with the house {not pictured} when we moved in was nice, but way too fancy for us. The entire edging around the table had intricate carved designs. {Que kids who drip syrup every morning} After living with it for four or five years now, I finally decided it was time for a change. I was going to build a farmhouse table using Ana White's plans but after finding this on craigslist, I decided this would be easier.
 SO! I bought this puppy for $80 {it was listed for $100}, and upon unloading it upside down from the truck I saw a "Made in Italy" stamp! Saa-weet! This baby is solid wood, even the entire tabletop is ONE piece of solid wood. It had been routed to look like it was separate boards, but I'll get to that later. First up, I used my sander and 40 grit sandpaper to remove the finish and scratches from the tabletop and edges. My original plan was re stain the top dark, and do the legs and bottom of the table cream and distress it.
 Herein lies the problem. These grooves in the wood, {which I could envision syrup getting in} needed to be filled in. I bought stainable wood filler but was still skeptical that you wouldn't be able to tell the difference from the wood to the filler. I was right. After I filled the cracks and let it dry completely, I sanded it again, this time with 120 grit disks. Next, I stained the whole top {I justified that I hadn't completely wasted a day of sanding by telling myself I DID have to get those big scratches out anyway}.
 Can you see all those tiny dimples all over the wood? Brandon told me that they do that on purpose for decoration. Say what?! Looks like a kid took a nail and hammer to the whole thing. I filled some of them in with filler, and some I just made sure the paint got all the way in so that they weren't as obvious. I knew the distressing at the end would also aid in masking their imperfections. That's the beauty of distressing. ;)
 The table that came with the house {not pictured} when we moved in was nice, but way too fancy for us. The entire edging around the table had intricate carved designs. {Que kids who drip syrup every morning} After living with it for four or five years now, I finally decided it was time for a change. I was going to build a farmhouse table using Ana White's plans but after finding this on craigslist, I decided this would be easier.
 SO! I bought this puppy for $80 {it was listed for $100}, and upon unloading it upside down from the truck I saw a "Made in Italy" stamp! Saa-weet! This baby is solid wood, even the entire tabletop is ONE piece of solid wood. It had been routed to look like it was separate boards, but I'll get to that later. First up, I used my sander and 40 grit sandpaper to remove the finish and scratches from the tabletop and edges. My original plan was re stain the top dark, and do the legs and bottom of the table cream and distress it.
 Herein lies the problem. These grooves in the wood, {which I could envision syrup getting in} needed to be filled in. I bought stainable wood filler but was still skeptical that you wouldn't be able to tell the difference from the wood to the filler. I was right. After I filled the cracks and let it dry completely, I sanded it again, this time with 120 grit disks. Next, I stained the whole top {I justified that I hadn't completely wasted a day of sanding by telling myself I DID have to get those big scratches out anyway}.
 Can you see all those tiny dimples all over the wood? Brandon told me that they do that on purpose for decoration. Say what?! Looks like a kid took a nail and hammer to the whole thing. I filled some of them in with filler, and some I just made sure the paint got all the way in so that they weren't as obvious. I knew the distressing at the end would also aid in masking their imperfections. That's the beauty of distressing. ;)
I stopped taking pictures because my hands were busy painting! After the stain dried overnight {after I wiped it off according to directions of course}, I painted 4 coats of "Honeymilk" high gloss Valspar paint from Lowe's. Originally I planned on using flat paint and then applying polycrylic clear coat on top. Then we saw how much the polycrylic costs. We rushed back to the paint counter and switched to high gloss before she tinted our paint. The high gloss will allow for wiping it down without taking the paint off.
 You see I'm missing two chairs. I'll be hitting up the thrift stores this week to find me some $5-$10 chairs that I can paint. I decided to do mis-matched chairs and a few different aqua colors.
I have three shades of aqua and I was going to do two of each color. I already had one heirloom white distressed chair so I'm toying with the idea of having the two end chairs match the table and the other four chairs aqua. That will probably be what I do.
 After the paint dried, I took fine sandpaper and distressed all the edges of the table. I also did some areas down the legs. This is the reason why I stained the whole top after realizing the wood filler would show...I wanted the dark stain to show through under the sanded places.

 This chair I originally painted heirloom white and had a gray and yellow fabric on the seat. I switched that all up and now it's good to go!
 This chair I bought at an estate sale a few weeks ago for $5. This one is the lightest aqua.
 Here is the heirloom white chair I already had.
 This chair is from that same estate sale, and it was $10. This one I actually used my free quart I got in the mail of Glidden paint in "Deepest Aqua" and then distressed it.

 Well, this project took me all weekend, but I did it! I'm super happy with how it turned out! Also this table isn't so enormous like my old one, so it gives us more room in the dining room. I'll be sure to post the finished look when I get my last two chairs done! :)
 You see I'm missing two chairs. I'll be hitting up the thrift stores this week to find me some $5-$10 chairs that I can paint. I decided to do mis-matched chairs and a few different aqua colors.
I have three shades of aqua and I was going to do two of each color. I already had one heirloom white distressed chair so I'm toying with the idea of having the two end chairs match the table and the other four chairs aqua. That will probably be what I do.
 After the paint dried, I took fine sandpaper and distressed all the edges of the table. I also did some areas down the legs. This is the reason why I stained the whole top after realizing the wood filler would show...I wanted the dark stain to show through under the sanded places.
 This chair I originally painted heirloom white and had a gray and yellow fabric on the seat. I switched that all up and now it's good to go!
 This chair I bought at an estate sale a few weeks ago for $5. This one is the lightest aqua.
 Here is the heirloom white chair I already had.
 This chair is from that same estate sale, and it was $10. This one I actually used my free quart I got in the mail of Glidden paint in "Deepest Aqua" and then distressed it.
 Well, this project took me all weekend, but I did it! I'm super happy with how it turned out! Also this table isn't so enormous like my old one, so it gives us more room in the dining room. I'll be sure to post the finished look when I get my last two chairs done! :)
Monday, July 4, 2011
Aqua Chair
I bought a couple of chairs at an estate sale on Saturday. The one in the background of my messy garage pic was $5, and the one I'm painting aqua was $10. I have plans that I hope to have completed within the next two weeks. I'd like take out the big fancy table and chairs that I've never really liked. It's pretty but there is detailed carving along the edges and with kids all the syrup drips and crumbs get stuck in there and it's REALLY hard to clean. It's also too fancy for the decor I'm going for. SO, I have plans to build my own farmhouse table using Ana White's plans and paint mis-matched chairs. I have four so far and I'm aiming for six. I'm sure they'll be easy to find at Rescued Treasures.  I used my free quart of Glidden paint that I got when they had their giveaway online. I ordered it in "deepest aqua". I gave it two thick coats of paint and then sanded it to distress it.

 I am still undecided as to if I'll do all different colored chairs or stick with one color and white. I've seen some cute ones with different colors. Check out all of these pictures from Pinterest and see what you think....
(Photo: hgtv.com) (Photo: justinetaylor.tmblr.com)
 (Photo: Absolutelybeautifulthings.blogspot.com)
 (Photo: Remodelista.com)
 This last pic is the farmhouse table I want to build. I don't want the bench though, just all chairs.
I used my free quart of Glidden paint that I got when they had their giveaway online. I ordered it in "deepest aqua". I gave it two thick coats of paint and then sanded it to distress it.
 I am still undecided as to if I'll do all different colored chairs or stick with one color and white. I've seen some cute ones with different colors. Check out all of these pictures from Pinterest and see what you think....
(Photo: hgtv.com)
(Photo: justinetaylor.tmblr.com)(Photo: Absolutelybeautifulthings.blogspot.com)(Photo: Remodelista.com)This last pic is the farmhouse table I want to build. I don't want the bench though, just all chairs.
Wednesday, September 1, 2010
Chair Makeover
I think I should be the Rescued Treasures spokeswoman! I LOVE their stores, I wish I had time to check them more often! I found this chair for $5.00, it had great potential but was still stuck in the 60's. 
 Yes, I have a messy garage.
 This was SO simple! I unscrewed the seat (only 4 screws, less than one minute!) and took it outside and spray-painted it an antique white. I did two coats.
 After it dried, and after I finally made it to the store for staples... I cut a piece of fabric and used my staple gun to re-cover it. You have to make sure you pull it evenly and TIGHT!
 Take a look....


 I love my five buck chair!!I already had the fabric so that saved me $$ too!
 Yes, I have a messy garage.
 This was SO simple! I unscrewed the seat (only 4 screws, less than one minute!) and took it outside and spray-painted it an antique white. I did two coats.
 After it dried, and after I finally made it to the store for staples... I cut a piece of fabric and used my staple gun to re-cover it. You have to make sure you pull it evenly and TIGHT!
 Take a look....

 I love my five buck chair!!I already had the fabric so that saved me $$ too!
Friday, August 13, 2010
Chair Re-Do (and table sneak peek!)
A few weeks ago, I bought a chair for $5 at Rescued Treasures. It was really dark wood (I forgot to take a "before" pic before my hubby started painting it). If you scroll down to the table, and look how dark the front two legs are, that is what it looked like, and it was all messed up.  We sanded it down today and Brandon used some antique white paint in a spray gun and sprayed it for me. After it dried, I used some sandpaper to rough up the edges of the wood and the seat as well. I love the way it turned out, and for only five bucks!
 Now we have an extra chair that we always seem to need in the dining room.
 Here is a sneak peek at my $10 table from Rescued Treasures. I sanded the top of it, and Brandon sprayed it the same antique white as the chair. I ran out and snapped a pic before he covered up all the dark wood. I love the chunky legs, and it's not a really high table, so it will be a good table to stick kids at when we have parties and holiday dinners. I love the size of it...not too small but not so big that you can't easily move it. It's going to be my "anywhere" table when I'm done with it. The paint looks great everywhere else, but it did something funky to the top, so I am re-sanding and possibly re-painting. I will post it when it's done!
We sanded it down today and Brandon used some antique white paint in a spray gun and sprayed it for me. After it dried, I used some sandpaper to rough up the edges of the wood and the seat as well. I love the way it turned out, and for only five bucks! Now we have an extra chair that we always seem to need in the dining room.
 Here is a sneak peek at my $10 table from Rescued Treasures. I sanded the top of it, and Brandon sprayed it the same antique white as the chair. I ran out and snapped a pic before he covered up all the dark wood. I love the chunky legs, and it's not a really high table, so it will be a good table to stick kids at when we have parties and holiday dinners. I love the size of it...not too small but not so big that you can't easily move it. It's going to be my "anywhere" table when I'm done with it. The paint looks great everywhere else, but it did something funky to the top, so I am re-sanding and possibly re-painting. I will post it when it's done!
Subscribe to:
Posts (Atom)