Showing posts with label spraypaint. Show all posts

Saturday, June 30, 2012

Nightstand Redo

Yesterday I happened to pass a garage sale on my way to the store. I kind of like that people are having Friday yard sales too now, more opportunities to stumble upon goodies in need of love. I've been working on changing our school room into Emma's room for the past month. I'm not done and ready to show it all yet, not by a long shot, but we're getting there! I moved our school room out to what used to be the play room. 
 She was in need of a nightstand next to her bed, and this piece was only $8 at the yard sale. It was laminate, but I decided to research how to paint laminate and give it a shot. It was only 8 bucks, after all.
 After some searching on Pinterest last night, I decided to try this tutorial from DIY Kinda Girl. I bought a quart of Zinsser Cover Stain Primer. I chose this one because she said it was designed to stick to any surface without sanding. You can click over and read her instructions, but basically I just did two coats of primer, followed by two coats of white paint that I already had on hand.
 I spray painted the knobs because I didn't want to buy new ones.
 This is another thing I added to her room-in-progress, a cupboard door hanger. Check out what it used to look like here. I peeled off the old vinyl lettering and added the peace sign, hearts, and pennants to match her room.
 She rushed to put a few items on her nightstand herself, so much for mom decorating. Ha ha.

I think this turned out to be another great yard sale find. I should be ready to share her room in another couple of weeks. I still need to buy or build a headboard.
Cost breakdown:
night stand $8
primer $8
paint (already owned)
spray paint (already owned)

Wednesday, July 6, 2011

Dollar Tree Cupcake Stand

I first saw this idea here. I had the wooden parts left over from other crafts. I went to the Dollar Tree and bought a set of burner covers. I really don't see the point in these things...are they for people who don't cook to cover up their burners with? Do burners need to be covered? Anyway...they came with two sizes in one pack.Look at how ugly they are!

I glued them together using Amazing E6000, and added the "feet".

That type of glue takes a long time to really dry so I let mine dry overnight. The next day I gave it a couple coats of black spray paint.

I decided to add some scalloped lace to the edges with a hot glue gun.

Not bad for $1 some scrap materials I had on hand!

Name Plaques

Do you see what I see? I ran into Big Lots yesterday after a trip to Rescued Treasures, since it was right next door. I'm on my never-ending quest for a cheap but perfect sized mirror. I want to make another acid mirror for the girls room. ANYWAY! I got to the front and they had a clearance bin with a few of these pretty shaped plaques marked down to a quarter! Now, do you see some scuffed up junk that no one is going to buy? OR...do you see a pretty shaped plaque that already has inset hanging hardware on the back ready to be spray painted and transformed? You already know, I see the latter.I snatched up my little boards, and paid my quarters! :) I took them outside and gave them two coats of Sweet Pea pink.

I never really liked the way I put the girls' names above their beds when I re-did their rooms. It just didn't look right to me. When I saw these at the store I knew exactly what I was going to use them for! I cut out their names with my Silhouette and I'm DONE! So easy!


That room has the worst lighting of the whole house, so sorry the pictures are grainy, but you get the idea. I like these SO much better! I think they make it look more "finished" and fancy. Total cost=$0.50!!

Tuesday, June 28, 2011

Girls Room Update

I noticed a few days ago {while watching the girls put on a princess fashion show, using their bed as a stage} that I haven't done anything to their room...ever! I'm ashamed to say that their name letters were still hanging in the same places on the walls as when there was a crib and twin bed in here! They looked TOTALLY out of place! They like to share a bed so that they're not alone at night. Fine by us! That means we have been getting ALL of our sleep for years! I moved the bed to the opposite wall it was on and added a headboard.

There was a set of two shutters at ReStore {two sets hinged together, with four panels total} that would have been perfect! They were tall enough that I could have just stood them up behind the bed. I took them up to the front to see how much they were...$25 each!! Nope! No way I'm spending fifty bucks on a headboard for a kids room! I went back and found two of these shutters. They were the perfect length for the queen bed, if I laid them on their side. They were $15 each. Still more than I wanted to spend, but twenty dollars cheaper than the other ones, and I REALLY wanted shutters! I painted them both with two coats of white paint.

We've had this pink, 3 bin sorter for years, but the dress up clothes have been camping out on the floor forever! Driving me c-r-a-z-y! I built this addition to it using 2 boards and a dowel rod! I tested it out to make sure it fit before painting it and securing. it.

I used my Silhouette and vinyl to put their names over their side of the bed and cut out "Royal Princesses". I also moved their old castles so that they can each put their little treasures in the one by their side. Kids always want to sleep with little trinkets that can get lost. Now they have a place to put it.

I hung the shutters by hammering in a sawtooth picture hanger on each end. First I hung the bottom one, and then hung the top one so that it's sitting on top of the bottom one perfectly. The slats on the shutters are opposites, because if I put them the same way there is a difference in the width of the top board and the bottom board.

This dollhouse has been on the floor since we bought it at a thrift store over a year ago. It had hangers on it, but I never bothered to hang it. Today I hung it above the little kids table and chair.

I moved the castle hanging basket to an area where I had room for it. The book sling has been there for awhile. I hung up some pictures that have been laying around and that the girls love.

I finished the dress up closet this morning. I gave it two coats of pink spray paint.


I had some brackets in our "junk basket" of odds and ends and they worked perfectly. I also used wood glue to give it some extra strength.

I kept the curtains the same because I love them. These were made by my sister in law for my niece when she was a teenager still living at home. Now she's married and gone so the curtains got passed down to us. The lighting in this room is horrible but it's a shimmery periwinkle fabric.It has beads hanging down from the trim.


I made a pennant for the shutters to tie in with the big ones stretching across the room. I love it so far! We're going to go tomorrow to look for a long mirror at a thrift store to go by the dress up area. I would also love to change the regular old light fixture to one of those chandeliers with the clear crystals hanging down. I think that would be perfect for a princess room!

Friday, May 13, 2011

School Room Project

I bought this at a thrift store about a week ago. I instantly thought "holder for all the different papers we use for school", then when I got it home I thought DUH, it's probably a magazine rack! Who knows, but NOW it is a paper holder! lol. It was $6.88 and it's solid wood. It was WAY heavier than it looked. I even had a hard time carrying it to the car. One coat of spray paint later, and it's ready for the second half of it's life! I thought it needed some added cuteness so I cut some pennants out of yellow vinyl using my Silhouette. It was super easy, just peel and stick!
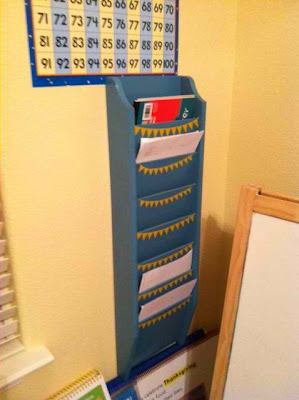
I hung it up tonight in the school room. We use so many different types of paper for different things that I'm always digging through my desk to find the right one. Once I line them all up in here it will be easy!

I love my little $7 project! :)

Friday, April 22, 2011

Shanty's Picture Holder

Quite some time ago, I saw this post on Shanty 2 Chic. It took me awhile, but I finally made one! I love how it turned out. My board is a different size and my little decorative pieces are different, but same idea!Did I mention that it was my birthday this week and my hubby got me a telescoping miter saw?! Yes, he's the best! This block of wood was my first cut, I'm in love! The other three pieces I got at Hobby Lobby. I put Gorilla Glue in the picture, but then switched to E6000. I glued it all together, and went to bed. Unfortunately one of the joints came apart the next day so I reattached that part with hot glue. Next I spray painted it in Rustoleum Heirloom White. Then I sanded the edges and rubbed a bit of Valspar Antiquing Glaze on it and then wiped it off with a cloth.


I tried to do a close up so that you could see the distressed edges.


Lastly, I hot glued on the clip and we're ready for a picture!


I love how it turned out and I REALLY love this picture on it. I might add a fabric rosette in the corner to jazz it up a bit. ;)