Showing posts with label furniture projects. Show all posts

Wednesday, June 19, 2013

DIY Trunk Coffee Table

I've wanted to make a coffee table out of an old trunk for awhile now. I bought this one at a yard sale last year. I spray painted it black when I bought it and used it as a prop trunk for a photo booth. It only got used once at a wedding, and since then it has sat in our storage trailer. Today I dug it out and screwed on four wheels from Lowe's. 
It doesn't get any easier than that! Now I have a cute little "table" that easily rolls around and doubles as storage! 

I pulled down one of the crates from my "top shelf" decorating to add more height, and just grabbed a couple of items from around the house. A mint birdcage and white milk glass candle are perfect. I wish all projects were this easy!

Saturday, June 30, 2012

Nightstand Redo

Yesterday I happened to pass a garage sale on my way to the store. I kind of like that people are having Friday yard sales too now, more opportunities to stumble upon goodies in need of love. I've been working on changing our school room into Emma's room for the past month. I'm not done and ready to show it all yet, not by a long shot, but we're getting there! I moved our school room out to what used to be the play room. 
 She was in need of a nightstand next to her bed, and this piece was only $8 at the yard sale. It was laminate, but I decided to research how to paint laminate and give it a shot. It was only 8 bucks, after all.
 After some searching on Pinterest last night, I decided to try this tutorial from DIY Kinda Girl. I bought a quart of Zinsser Cover Stain Primer. I chose this one because she said it was designed to stick to any surface without sanding. You can click over and read her instructions, but basically I just did two coats of primer, followed by two coats of white paint that I already had on hand.
 I spray painted the knobs because I didn't want to buy new ones.
 This is another thing I added to her room-in-progress, a cupboard door hanger. Check out what it used to look like here. I peeled off the old vinyl lettering and added the peace sign, hearts, and pennants to match her room.
 She rushed to put a few items on her nightstand herself, so much for mom decorating. Ha ha.

I think this turned out to be another great yard sale find. I should be ready to share her room in another couple of weeks. I still need to buy or build a headboard.
Cost breakdown:
night stand $8
primer $8
paint (already owned)
spray paint (already owned)

Wednesday, June 20, 2012

Trash to Entry Table

I must say, this is one of my all-time favorite re-do's! It was a whopping $15 at a yard sale Saturday! 
 Check out what it started out as...
 Of course my hubby thought I was crazy (again!), but I saw potential. I loved the doors, but there was a section of one of them missing. Because of the detail in the panels, I decided to just remove them. I saved them so that I can use them for something else.
 It was completely filthy, and full of spider webs. The first step was to spray this sucker with bug spray, especially underneath!
 The next thing I did was pressure wash it REALLY good. There was some thin paneling type of wood on the top of it, which had already peeled off in sections, so I decided to take the rest off, and go with the wood planks I saw underneath it. The paneling was glued down pretty good, so I used a scraper and tapped it with a hammer to chip it off.
 After that, I sanded the top to get off the stuck on pieces.
 You'll see I started to paint the interior sections gray, but I decided it wouldn't match my house. I ended up switching to the same Valspar Honeymilk that I used on my dining room table.
 Removing the doors wasn't as easy as it seemed. There was a stripped screw on this side and it wouldn't allow the metal hinge to come off. In the picture below, you can see the door closure pieces that also would not come off with screw drivers or drills.
 I saw my hubby use his sawzall the other day to cut screws so I asked him to borrow it. He didn't have time to do it for me, so I went ahead and did it. It's kind of fun to use a new tool! Especially when you still have all of your fingers left when you're done. ;) It easily cut off all of these pieces and I was good to go!
 After the paint dried, I used sandpaper to distress the edges of the cabinet and drawers. I had a really hard time finding drawer pulls that were small, like the originals. The original pulls were one short, so I needed new ones. I settled on these from Hobby Lobby and spray painted them black. I lined them up so that they would cover the old holes.
 Then I simply screwed them on with a cordless drill.

I bought two baskets at Hobby Lobby for 50% off, but wanted to jazz them up a bit. I stumbled across these metal numbers and knew what I wanted to do. I simply cut a piece of jute, and tied a knot in the center of it. I pulled it through the hole in the number.

 Now I'm ready to tie it to the basket.
 I placed it where I wanted it, and slipped the jute through the basket.
 I tied it in a double knot around one of the weaves in the basket.
 Love it!
I can't wait to figure out what I want to store in here! The black bins are from Target. 


I am SO glad I bought this thing!!! :)
I am excited to link up to Beneath My Heart's "Best DIY Projects of June" Party!
Positively Splendid

Saturday, January 21, 2012

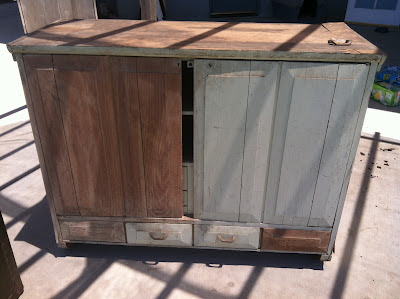
Antique Hutch Re-do

Yesterday I worked ALL day on fixing up my new hutch/cabinet thingy, whatever you wanna call it! Here is a quick side by side before and after! Click here for the before post.Crazy! What a difference a day can make! The picture below is a shot of the inside of the top section, after I painted the interior walls. I decided to use the roll of beadboard wallpaper that I already had to line the shelves.

Super easy fix! Just measure, cut, wet, and smooth it out!
The below picture is the interior of the bottom section. I love that there is a top shelf. I have SO much kitchen crap, you don't even know!

Here is what it looks like after I started filling it and decorating the top. I took a drawer from my top shelf decorating (and it looks fine without it). I just love the look of the natural wood with some areas of white washing, and the beautiful drawer pull I added. Mixing old with pretty just totally does it for me! I flipped it over, so that the stuff on top wouldn't lose a few inches of visibility by being IN the drawer. There was a wooden track on the bottom of the drawer, keeping the stuff from sitting flat, but that was nothing a hammer couldn't remove. ;)
Here is a close up of the inside of one of the doors. It's the easiest way to see that the paint is not solid. The lighting in my dining room make it hard to see in pictures. In case you're wondering, it's called Kiwi Kissed by Olympic, from Lowe's. It looks totally different on the swatch, than on the furniture, if you ask me, but it was the perfect match.
Ok, before and afters...


This is the closure for the top half.


As for the drawers, they were really ugly inside, so I wiped them down and also lined them with the beadboard wallpaper.
One last shot, you can see the tops of chairs because I'm standing on the opposite side of the dining room table. I'd take a room shot, but my table is quite the mess from all of yesterday's work and I haven't taken care of cleaning it off yet. ;)
It is my favorite piece in my house now! It cost $90 (it IS from an antique dealer after all), and less than $3 for the paint sample size (since I only lightly dry brushed over it). I already had the drawer pulls from Restore, and the knobs were probably less than a buck. I also already had the wallpaper and white paint for the interior of the bottom section.